
Configure Vtiger QuickBooks Integration
Web Connector and QBXML Version
- Go to Tools -> Boru VT-QB, click on “Web Connector and QBXML Version”

Web Connector Configuration
- Enter(make one up) Your Application Name
- Enter path to your QuickBooks Company file. The path is where your QuickBooks company file is located.
- Hit “Add” to add the item. Note, you can add multiple QuickBooks files, enable and disable them from the sync.

On the Webconnector PC/Server:
- When QB IS NOT OPEN then the WebConnector will connect to the QB file in VTQB setting.
- When QB IS NOT OPEN then the WebConnector will try to connect to the open QB file — but fail. If the open QB file isn’t same as QB file in VTQB setting then we will receive “Application requested to abort” message in the WebConnector.
QBXML version
- We recommend to keep XML version 8.0, it works with most of the QuickBooks versions.

QuickBooks Timezone
- Go to http://php.net/manual/en/timezones.php and find your timezone, then update below.

Webconnector Password
- Please update the password for the webconnector(this password will be used to communicate with your QuickBooks and vTiger). The default password is ‘admin’.

Web Connector Setup
- Please update the password for the webconnector(this password will be used to communicate with your QuickBooks and vTiger). The default password is ‘admin’.
Download Web Connector
- Click Here to download most recent version of Web Connector
Install Web Connector
- If you are Windows 7 user, please disable UAC before you start the Web Connector installation.
- Run the downloaded file and install the application.
Configure .QWC File
- Create a new file called ‘Quickbooks.QWC’
- Make sure that the extension is .QWC
- You might need to go to Folder options and enable “Show known file extensions”
- Paste the code below into the newly created file:
<?xml version="1.0"?>
<QBWCXML>
         <AppName>App_Name</AppName>
         <AppID></AppID> <AppURL>https://abc.com/vtigercrm/modules/QuickBooks/vQuickBooks/server.php?app=App_name</AppURL>
        <AppDescription>An example QuickBooks SOAP Server</AppDescription>
<AppSupport>https://abc.com/vtigercrm/modules/QuickBooks/vQuickBooks/support.php</AppSupport>
      <UserName>admin</UserName>
      <OwnerID>{57F3B9B6-86F1-4fcc-B1FF-166DE1813D28}</OwnerID>
      <FileID>{57F3B9B6-86F1-4fcc-B1FF-966DE1813D28}</FileID>
      <QBType>QBFS</QBType>
      <Scheduler>
           <RunEveryNMinutes>60</RunEveryNMinutes>
           </Scheduler>
      <IsReadOnly>false</IsReadOnly>
</QBWCXML>
- Adjust the following variables:
- Line 3: Change App_Name to the name you set in “Application Name” field when configuring Web Connector settings in vTiger. In this guide we set it as “BoruQuickBooks”.
- Line 4: Change App_Name to the name you set in “Application Name” field when configuring Web Connector settings in vTiger. In this guide we set it as “BoruQuickBooks”.
- Line 4: Change abc.com/vtigercrm to your vTiger domain/folder.
- Line 6: Change abc.com/vtigercrm to your vTiger domain/folder.
- If you have the secure certificate, make sure you keep the https://. If you don’t have the certificate – please follow these instructions:
-
- Open the Windows Start menu on the web connector host machine.
- Select Computer.
- Go to either:
- C:\Windows\System32\Drivers\
Etc - C:\Windows\Syswow64\Drivers\
Etc
- C:\Windows\System32\Drivers\
- Double-click the host file, then select Notepad.
- Enter the ip address where Vtiger is located and then the servername (see the example provided in the host file)
- The server name should be (no quotes): ‘localhost-qb’
- In your webconnector config file your url would be similar to:
- https://localhost-qb/
vtigercrm/modules/QuickBooks/ vQuickBooks/server.php?app= App_name
- https://localhost-qb/
If you haven’t done so already then we recommend that you put an SSL on the Vtiger installation to protect your data. Doing so will also allow the web connector to communicate with Vtiger using the secure SSL.
-
- Save the file.
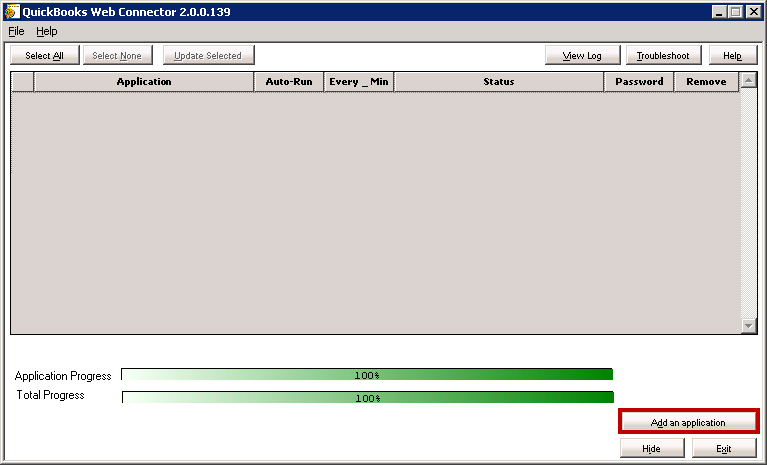
Add An Application to WebConnector
- Open Web Connector
- Open QuickBooks, login as Admin.
- Hit “Add an Application” and navigate to the .QWC file you just created.
- You will be prompted to allow access to the Quickbooks, hit “OK”

- You will be prompted to allow to read and write to the Quickbooks file. Select “Yes, always; allow access even if QuickBooks is not running”.

- Hit “Done” to complete the operation.

- If the application was added successfully – it will show up as below:

- 1) Enter the password that you updated in the “WebConnector Password” section, if you didn’t – just enter ‘admin’.
- 2) 60 indicates that webconnector will connect to QuickBooks and vTiger every 60minutes and send/receive the items.
- 3) You can specify if you want sync to auto run.
- 4) When this is checked – it means the auto run and the “Update Selected” is active.
- 5) When #4 is checked, you can run the update manually.
Setup Cron Job
- This cron job will trigger automatic sync from QB to vTiger. Please do NOT create this cron until QB and vTiger was configured and the initial sync has run.
Linux distributions vary, but this is one way:
- Enter the cron file
$ crontab -e
or
pico /etc/crontab
- The example below will update every hour, at 30 minutes past the hour.
30 * * * * root php -f YOURVTIGERCRMDIR/modules/QuickBooks/Transaction.php
Modules to Sync
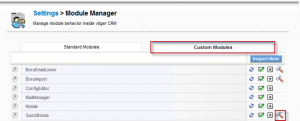
- Go to “Settings” > “Module Manager”Item 2

- Select “CustomModules” tab, and click on the wrench to access the configuration.
Sync QB Customers As Accounts/Contacts
First we need to select sync method for QB Customers. The value selected below will be used for 2-way sync. You need to know if your Quickbooks is accounts or contacts centered.
- If you set the value to “Account” – all QuickBooks customers will sync to vTiger as “Accounts”.
- If you set the value to “Contact” – all QuickBooks customers will sync to vTiger as “Contacts”.
![]()
Conflict Priority
-
Select if QB or VT will win if both records were modified.
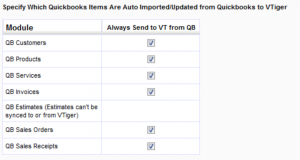
Specify The Modules For 2-way Sync
-
- You can specify which modules you want to auto sync. This section is only used to set which modules will auto update FROM vTiger TO Quickbooks for the items that were synchronized from Quickbooks to vTiger. For example if you sync an Account from Quickbooks to vTiger and check the check box for “QB Customers”, then when you edit Customer in vTiger it will sync the change from vTiger to Quickbooks. If the check box for “QB Customers” is unchecked – then the changes in vTiger will NOT sync back to Quickbooks.
- Note, this is ONLY for items synched from Quickbooks to vTiger.
Tax Mode Settings
You can set the Tax Mode for each module that is synchronized from QuickBooks to vTiger.
- Group – When you sync an item from Quickbooks to vTiger it will use the same tax for all the line items (products/services) in the Invoice. For example: if there is an invoice in QB with ProductA and ProductB, then when the invoice is synched it will apply the tax that set in invoice for both of these products. In this case, if invoice tax is set to 5%, then 5% will be applied to both ProductA and ProductB.
- Individual – When you sync an item from Quickbooks to vTiger, it will use individual taxes for the line items (products/services) in the Invoice. For example: if there is an invoice in QB with ProductA and ProductB, then when the invoice is synched it will apply the individual tax that is set for each line item in invoice. In this case, ProductA can have 10% tax, and product ProductB can have 20% tax.
Transaction Mapping
Accounts and Contacts
- Here you have to setup the mapping for your QB Customers that will synchronize from QB to vTiger, and from vTiger to QB. You should have already had set where to sync your QB Customers(to Accounts or Contacts in vTiger) and now you need map the fields. You only need to map one of them, depending on your selection in the beginning. If your Quickbooks are accounts centered then you map the “Account Mapping section” or if your Quickbooks are contacts centered – then you map the “Contact Mapping section”.

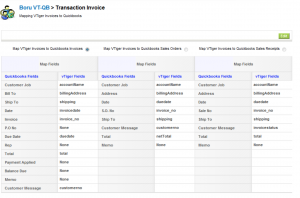
Invoice
- Here you have to decide how you want vTiger Invoices to be mapped to Quickbooks. There are 3 options:
- 1) Map VTiger Invoices to Quickbooks Invoices.
- 2) Map VTiger Invoices to Quickbooks Sales Orders
- 3) Map VTiger Invoices to Quickbooks Sales Receipts
- Select how you want vTiger invoices to show up in Quickbooks and adjust the mapping. Note: you can only select one of the options and you only need to map the selected option.
Sales Orders
- Here you have to decide how do you want vTiger Sales Orders mapped to Quickbooks. You have 3 options:
- 1) Map VTiger Sales Orders to Quickbooks Invoices
- 2) Map VTiger Sales Orders to Quickbooks Sales Orders
- 3) Map VTiger Sales Orders to Quickbooks Sales Receipts
- Select how do you want vTiger Sales Orders to show up in Quickbooks and adjust the mapping. Note, you can only select one of the options and you only need to map the selected option.

Quotes
- Here you have to decide how do you want vTiger Quotes mapped to Quickbooks. You have 3 options:
- 1) Map VTiger Quotes to Quickbooks Invoices
- 2) Map VTiger Quotes to Quickbooks Sales Orders
- 3) Map VTiger Quotes to Quickbooks Sales Receipts
- Select how do you want vTiger Quotes to show up in Quickbooks and adjust the mapping. Note, you can only select one of the options and you only need to map the selected option.

Taxes, Discounts and Price Settings
Discounts and Taxes
- One of the critical steps is to create “Tax Non” item – it will be require for sync to function properly. Click on the “here” hyperlink in the settings area, and you will be redirected to “Settings > Tax Calculations”, and then add “Tax Non” item for Products & Services as well as Shipping & Handling Taxes.

- Next step in configuring taxes is to import taxes and discounts from Quickbooks to vTiger. to do so, you have to click “Import Discounts and Taxes” and run webconnector. After the sync finishes, you should refresh the screen and see the vendors and discounts imported from Quickbooks.
- When we synchronize products or services from vTiger to items in Quickbooks, an account is necessary to manage those items. After you did the “Import Discounts and Taxes” – you should see Vendors imported from Quickbooks. You can select one or leave it as “Default”.
- Similar situation with discounts, when you synchronize products and services from vTiger to Quickbooks, an account is necessary to make the discount item, so we also need to set the account to manage discounts. You can select one or leave it as “Payroll Expenses”.

All discounts in Vtiger, at both the line level and subtotal level, are created in QuickBooks as a “Discount” line item when synced into Quickbooks. E.g.:
- With a discount at the line level: When syncing to QB, the system will add a new discount line for each line item. Ex: LineItem1,Discount, LineItem2,Discount
- With a discount at the subtotal level: When syncing to QB, the system will add a new discount line at the bottom. Ex: LineItem1, LineItem2,Discount
Price Style
- Select the price format of items in Quickbooks. It has to be the same as in your Quickbooks in order for amounts to sync properly.

Import Quickbooks Data Into Vtiger
VTQB Sync
In order to have a successful sync you must follow these steps in the order they are listed.
Configure synchronization for modules
- We have already completed the first step in the Specify The Modules For 2-way Sync section, so we can skip this step. If you did not do this – please follow the instructions here
![]()
Set a Date for Import
- Set a date for import. This date setting will import all transactions, invoices, quotes and sales orders, from the date selected to today. We usually recommend setting the cut off date within the last week just to test and monitor first few transactions. When you are comfortable importing them all please set the latest date possible.
![]()
Import Discounts and Taxes
- We have already completed this step in the Taxes, Discounts and Price Settings, If you have not done this yet – please click here to to import discounts and taxes.

Import Customers
Using this section you will import your QuickBooks Customers into vTiger.
- 1. Click “Import Cusomter” button to trigger the import.
- 2. Run web connector manually. (hit “Update Selected” in web connector)
- Note – The time it takes to import all contacts will be determined by how many customers there are in Quickbooks.
- 3. Wait for sync to finish before moving on to next step.
- Tip – Open Transfer History and refresh Transfer History browser tab frequently. Now the transfer can be monitored and when new pages are not added to the history anymore the sync is complete.

Import Items
Using this section you will import your Quickbooks Items into vTiger.
- 1. Click “Import Items” button to trigger the import.
- 2. Run web connector manually. (hit “Update Selected” in web connector)
- Note – The time it takes to import all contacts will be determined by how many items there are in Quickbooks.
- 3. Wait for sync to finish before moving on to next step.
- Tip – Open Transfer History and refresh Transfer History browser tab frequently. Now the transfer can be monitored and when new pages are not added to the history anymore the sync is complete.

Import Transactions
Using this section you will import your QuickBooks Transactions into vTiger.
- 1. Click “Import Transactions” button to trigger the import.
- 2. Run web connector manually. (hit “Update Selected” in web connector)
- Note – The time it takes to import all contacts will be determined by how many transactions there are in Quickbooks.
- 3. Wait for sync to finish before moving on to next step.
- Tip – Open Transfer History and refresh Transfer History browser tab frequently. Now the transfer can be monitored and when new pages are not added to the history anymore the sync is complete.
- 4. Congratulations you have synced your Quickbooks to vTiger.

Logs
Transfer History
- Transfer history is used to track and troubleshoot the sync process. Here you can see the items that were synched from vTiger to QB and from QB to vTiger.
- Time – When the sync occurred
- Type – What was synched(Accounts, Invoice, Quote, etc..)
- Number – Unique item id in vTiger(accountid,invoiceid,quoteid, etc.. or crmid)
- Name – Subject/name of the item synched(account name, invoice subject…)
- Direction – What type of sync – QB > VT or VT > QB.

Error Log
- Error Log is used for troubleshooting issues that occur during the sync. It is very helpful to look at it if some of the items are not synchronizing.

Intro
- Starting in version 2.1, users can enable support for payment gateways.
- Supported Gateways: Quickbooks Merchant Services
- Transaction Info sources: The Boru Vtiger Ubercart module can transfer Quickbooks Merchant Services data to Vtiger out of the box.
- Benefits: When transaction info from a Quickbooks Merchant Services account is sent to Quickbooks, Quickbooks can automatically reconcile the Sales Receipt with the credit card company’s deposit in your bank account.
Configure
- Go to the VTQB config page and click ‘Configure’

- Check the box next to the gateway you want to enable.

Field Mapping
- If you are using the Boru Vtiger Ubercart module with Quickbooks merchant services, all necessary fields are created and mapped correctly by default. View and edit the mapping from the ‘Field Mapping’ page found under the ‘Payment Gateways’ section.

- Select the appropriate gateway from the dropdown and edit.

Settings
Which way to be synced first?
User can select which way to be synced first: from QB->VT or VT->QB

Resync data
- If checked – it will only sync the data that has been modified(Recommended).
- If unchecked – it will sync all data regardless if it was modified(Not recommended – only used when data needs to be resynched).

Sync Invoice’s Custom Fields
- User can create custom fields from QuickBooks’s invoice, when sync it will be created custom fields block in vTiger’s invoice.
- It only works for Invoice module.
![]()
- It will be created this widget for custom fields in vTiger’s invoice.

Sync Invoice’s Job field
- Link Invoice by Invoice’s Job field. When this feature enabled system will:
1. Will not create job in VT when sync Job from QB to VT.Account
2. When sync Invoice of job in QB to VT, invoice will be linked with Account and job field in Invoice module.

Remove Customer Name in Address?
- When user create new Customer in QuickBooks, it will be added Customer name to Address and it will be synced this Address to vTiger address that included Customer name. Check if don’t want it work like that.
![]()
Remove line item Sub Total from Transactions
- When sync a transaction, it will be added a “Sub Total” line item in that transaction. Check if you want to remove it.
![]()
Markup on QuickBooks’s Estimated
- Set markup to zero when sync vTiger.Quote->QB.Estimate
- For only sync from VT->QB
![]()
Sync Other Invoice Fields to Description
- If you want to sync more vTiger’s Invoice fields to QuickBooks’s Invoice.
- Go to mapping invoice fields page for this feature.
- Add fields you want to be added to QuickBooks’s invoice description.
- It only sync data from VT->QB.

Sync Other SalesOrder Fields to Description
- If you want to sync more vTiger’s Sale Orders fields to QuickBooks’s Invoice.
- Go to mapping Sale Orders fields page for this feature.
- Add fields you want to be added to QuickBooks’s Invoice description.
- It only sync data from VT->QB.

Sync with Multiple Related Module
- If you vTiger setup to link to multiple related modules like address, invoices, quotes.
- Select all 3 checkboxes to work with this feature.


